


WEST SYSTEM® | Epoxy Basics | Guide 06
Two-step bonding — wet out the surfaces with neat epoxy, then apply thickened epoxy to one of them — is the method to use for most structural joints. It gives maximum penetration into the bonding surface and prevents epoxy-starved joints.
Single-step bonding has its place on lightly loaded joints where absorption into a porous surface is not an issue. Either way, epoxy bonds best when it is worked into the surface with a roller or brush.
Before you mix anything: check every part for fit and surface preparation, gather the clamps and tools you will need, and cover anything that needs protecting from spills. Epoxy will not wait for you.
Method from WEST SYSTEM instructional material. Refer to the current technical data sheet for full product specifications and suitability.
3 factors
Joint strength is the ability of a joint to transfer a load from one part to another. It depends on the combined effect of three things — and a weakness in any one of them sets the strength of the whole joint.
Primary bonding relies on the chemical linking of adhesive layers — the wet lay-up of a fibreglass laminate in a mould, for example, where every layer of epoxy cures together as one fused layer. Epoxy applied over partially cured epoxy chemically links with it, and is also a primary bond. That ability diminishes as the epoxy cures.
Secondary bonding relies on mechanical linking to a material or to a cured epoxy surface. The adhesive has to key into pores or scratches — a microscopic dovetail joint. Proper surface preparation is what provides that texture.
4 steps
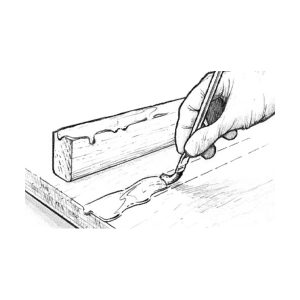
The preferred method for most situations: it promotes maximum epoxy penetration into the bonding surface and prevents epoxy-starved joints.
Apply a neat resin/hardener mixture — no fillers — to the surfaces to be joined. Use a disposable brush for small or tight areas; a foam roller or plastic spreader for larger ones.
You can move to step two immediately, or any time before the wet-out coat reaches final cure.
Stir the appropriate filler into the mixture until it is thick enough to bridge any gaps between the mating surfaces and prevent a resin-starved joint. Apply enough to one surface that a small amount squeezes out when the parts are brought together with a force equivalent to a firm hand grip.
For most small bonding operations, add the filler to what is left of the batch you used for the wet-out. Mix enough resin/hardener for both steps, add the filler promptly, and allow for the shorter working life of a thickened mixture.
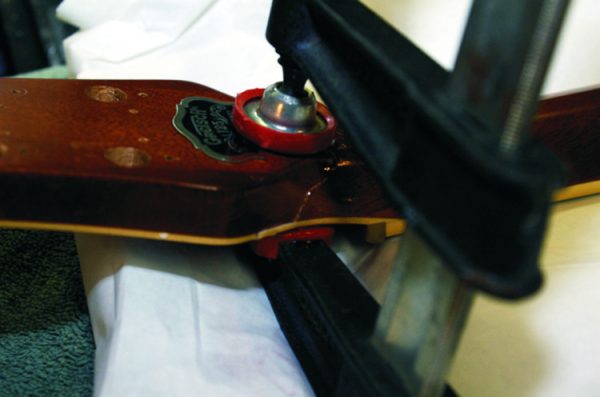
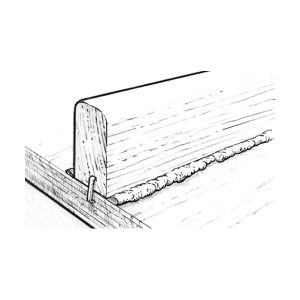
Attach clamps as necessary to hold the components in place. Use just enough pressure to squeeze a small amount of epoxy from the joint — that bead is the evidence the epoxy is in contact with both mating surfaces.
Avoid excessive clamping pressure, which can force all the epoxy out of the joint.
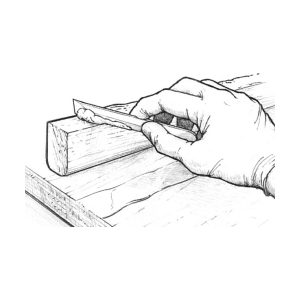
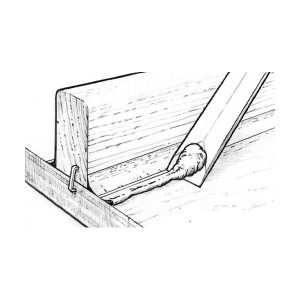
Deal with the squeeze-out as soon as the joint is clamped. A wooden mixing stick with one end sanded to a chisel edge is the ideal tool — or shape it into a fillet instead of removing it.
When it is appropriate
Single-step bonding applies thickened epoxy directly to both bonding surfaces, without wetting out first with neat resin/hardener. It suits joints with minimal loads where excess absorption into a porous surface is not a problem.
Thicken the epoxy no more than is necessary to bridge gaps in the joint — the thinner the mixture, the more it penetrates the surface.
Do not use single-step bonding for highly loaded joints, or for bonding end grain or other porous surfaces. Wet those out first.
Clamping methods
With epoxy, any method of clamping is suitable as long as the parts are held so that movement cannot occur. Common methods:
When placing clamps near epoxy-covered areas, cover the clamp pads with duct tape, or put polyethylene sheeting or release fabric under them, so they do not bond to the surface. Staples, nails or drywall screws are often used where conventional clamps will not work — any fastener left in place should be a non-corroding alloy such as bronze. In some cases the thickened epoxy, or gravity, will hold parts in position without clamps at all.
Pre-coating porous surfaces with neat (unthickened) epoxy before applying a thickened adhesive or fairing compound improves adhesion: neat epoxy penetrates and keys into surface pores and end grain better than a thicker mixture.

Panels and composites
Laminating means bonding a number of relatively thin layers — plywood, veneers, fabrics or core material — to create a composite. The layers may all be the same material or a combination of different ones. How you apply the epoxy and how you clamp both depend on what you are laminating.
Because of the large surface areas and the limits of wet lay-up time, roller application is the most common method. A faster method on large surfaces is to pour the mixture onto the middle of the panel and spread it evenly with a plastic spreader. Apply thickened mixtures with an 809 Notched Spreader.
Staples or screws are the most common method when laminating a solid material to a solid substrate. An even distribution of weights works when the base will not hold staples or screws — foam or honeycomb core, for instance.
Vacuum bagging is the ideal clamping method for a wide range of materials: with a vacuum pump and plastic sheeting, atmospheric pressure applies perfectly even clamping pressure over every part of a panel, regardless of its size, shape or number of layers.
4 steps
A fillet is a cove-shaped application of thickened epoxy that bridges an inside corner joint. It increases the bonding area and acts as a structural brace — and every joint that will be covered with fibreglass cloth needs one to support the cloth around the inside corner.
The procedure is the same as normal bonding, except that instead of removing the squeezed-out thickened epoxy after clamping, you shape it. For larger fillets, add thickened mixture to the joint as soon as the bonding operation is complete and before the bonding mixture has fully cured — or any time after final cure, once the exposed epoxy in the fillet area has been sanded.
Bond the parts using the two-step method above, clamping to a small squeeze-out along the joint line.
Draw a rounded filleting tool — a mixing stick will do — along the joint, dragging the excess material ahead of the tool and leaving a smooth cove bordered on each side by a clean margin. Use the excess that gathers outside the margin to re-fill any voids, and smooth the fillet until you are satisfied with its appearance.
A mixing stick leaves a fillet of about 9.5 mm (3/8 in) radius. For larger fillets an 808 Plastic Squeegee, cut to shape or bent to the radius you want, works well. Apply additional thickened epoxy along the joint line with the rounded mixing stick, using enough to create the size of fillet you need.
For long or repeated fillets, an empty caulking cartridge or a disposable piping bag lays a consistent bead — cut the tip to suit the fillet size. A heavy-duty sealable food bag with one corner cut off does the same job.
Clean up the remaining excess outside the margin with a sharpened mixing stick or a putty knife. Fibreglass cloth or tape may be applied over the fillet area before the fillet has cured, or after it is cured and sanded.
Sand smooth with 80-grit paper after the fillet has fully cured. Wipe the surface clean of dust, then apply several coats of resin/hardener over the whole fillet area before final finishing.
Further reading. Tom Pawlak's article Bonding with Fillets in Epoxyworks 44 covers fillet sizing and tooling in more detail.
4 questions
Only enough to squeeze a small amount of epoxy out of the joint — roughly the force of a firm hand grip. That bead confirms contact with both mating surfaces. Too much pressure forces the epoxy out and starves the joint.
Wet out first for anything structural, and always on end grain or other porous surfaces. Single-step bonding — thickened epoxy straight onto both surfaces — is only appropriate where loads are minimal and absorption is not a concern.
Thick enough to bridge the gap in the joint and no thicker. The thinner the mixture, the further it penetrates the bonding surface.
About a 9.5 mm (3/8 in) radius. For a larger fillet, cut or bend an 808 Plastic Squeegee to the radius you want and add more thickened epoxy along the joint line.
Supplied by ATL Composites
Resin & hardeners
105 Epoxy Resin with 205 Fast, 206 Slow, 207 Special Clear and 209 Extra Slow Hardeners.
Fillers
Australian range: 410 Microlight, 411 Microsphere Blend, 413 Microfibre Blend and 417 Low Density Filler.
Application tools
Static mixers, mixing sticks, flexible squeegees, roller frames and covers, and mini syringes.
Process materials
Bagging film, breather, release fabrics, sealant tape and pumps for even clamping pressure across a panel.
Browse the full WEST SYSTEM range supplied by ATL Composites.
View the WEST SYSTEM rangeGuide only. Adapted from WEST SYSTEM instructional material (original guide). Read the product label and the current technical and safety data sheets before use.
Guide 06 of 11
Discuss your process requirements with our technical team on +61 7 5563 1222 or [email protected].
WEST SYSTEM® and 105 Epoxy Resin® are registered trademarks of Gougeon Brothers, Inc., USA. Manufactured and distributed in Australia by ATL Composites Pty Ltd. Diagrams and instructions courtesy of WEST SYSTEM.